前两天刚说要给博客加功能,这不就来了嘛,内置了基础的网站分析功能,并可公开访问。
大部分博主几乎都是使用第三方的网站分析,比如 Google Analytics、 Plausible、Umami、Posthog、Matomo 等。
但有几个问题比较难解决:
1. 需要加载第三方的 js 代码
2. 如果安装了类 uBlock 插件,则脚本会被阻止
3. 隐私和维护问题
综上,在VersunCMS上集成该功能刻不容缓,所幸有一个针对 Rails 编写的网站分析包:ankane/ahoy,非常简易好用,步骤如下:
1. 添加包到 Gemfile
大部分博主几乎都是使用第三方的网站分析,比如 Google Analytics、 Plausible、Umami、Posthog、Matomo 等。
但有几个问题比较难解决:
1. 需要加载第三方的 js 代码
2. 如果安装了类 uBlock 插件,则脚本会被阻止
3. 隐私和维护问题
综上,在VersunCMS上集成该功能刻不容缓,所幸有一个针对 Rails 编写的网站分析包:ankane/ahoy,非常简易好用,步骤如下:
1. 添加包到 Gemfile
gem "ahoy_matey"
然后执行命令安装
bundle install
rails generate ahoy:install
rails db:migrate
2. 添加事件跟踪代码到 app/controllers/application_controller.rb
class ApplicationController < ActionController::Base
  after_action :track_action
 #.....
  protected

  def track_action
    ahoy.track "Viewed", request.path_parameters
  end
3. 添加 Analytics 控制器
rails g controller analytics index
控制器代码如下
class AnalyticsController < ApplicationController
  def index
    @total_visits = Ahoy::Visit.count
    events = Ahoy::Event.where(name: "Viewed").where("properties->>'slug' IS NOT NULL")

    # 统计访问量并按数量排序,只取前10篇
    visits_count = {}
    events.each do |event|
      visits_count[event.properties] ||= 0
      visits_count[event.properties] += 1
    end
    @visits_by_path = visits_count.sort_by { |_, count| -count }.first(10).to_h

    @referrers = Ahoy::Visit.group(:referrer)
                            .count
                            .reject { |k, _| k.nil? }
                            .sort_by { |_, count| -count }
                            .to_h

    @browsers = Ahoy::Visit.group(:browser)
                           .count
                           .sort_by { |_, count| -count }
                           .to_h

    @operating_systems = Ahoy::Visit.group(:os)
                                    .count
                                    .sort_by { |_, count| -count }
                                    .to_h

    @devices = Ahoy::Visit.group(:device_type)
                          .count
                          .sort_by { |_, count| -count }
                          .to_h
  end
end
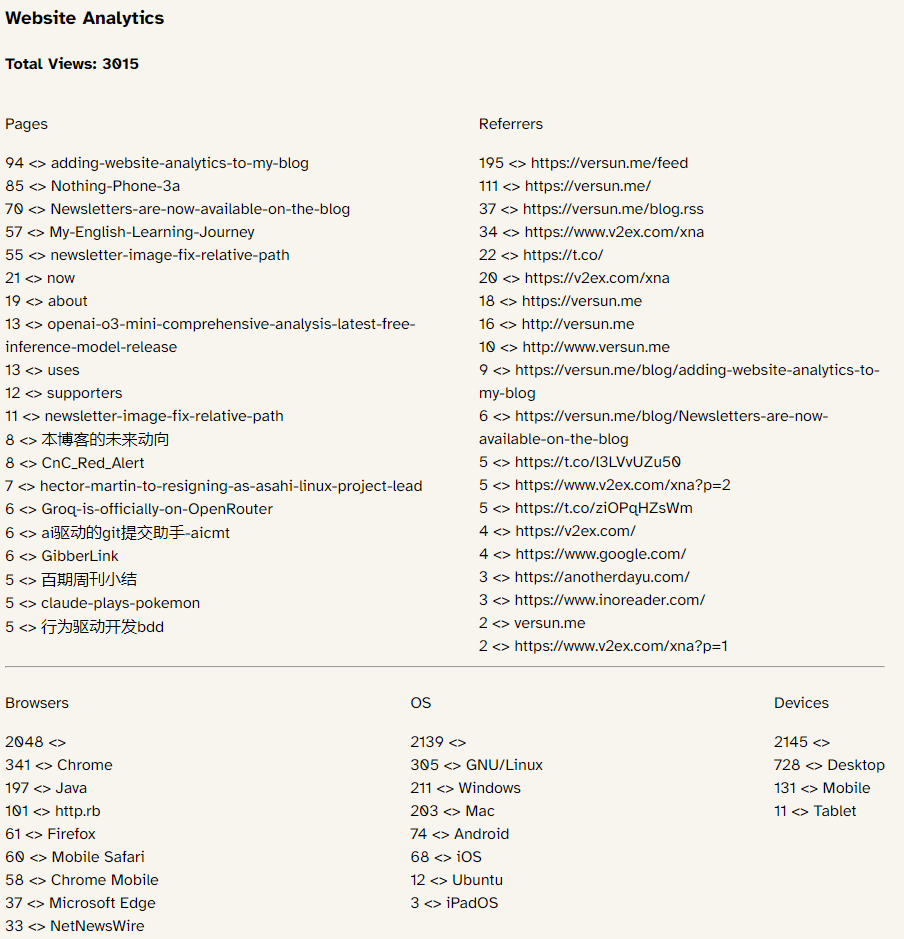
4. 修改视图文件 app/views/analytics/index.html.erb
<h3>Website Analytics</h3>
<div class="total-visits">
  <h4>Total Views: <%= @total_visits %></h4>
</div>
<div style="display: flex; justify-content: space-between;">
  <div>
    <p>Pages</p>
    <% @visits_by_path.each do |path_data, count| %>
        <%= count %> <>
        <%= path_data['slug'] %><br>
    <% end %>
  </div>
  <div>
    <p>Referrers</p>
    <% @referrers.each do |referrer, count| %>
        <%= count %> <>
        <%= referrer %><br>
    <% end %>
  </div>
</div>
<hr>
<div style="display: flex; justify-content: space-between;">
  <div>
    <p>Browsers</p>
    <% @browsers.each do |browser, count| %>
        <%= count %> <>
        <%= browser %><br>
    <% end %>
  </div>
  <div>
    <p>OS</p>
    <% @operating_systems.each do |os, count| %>
      <%= count %> <>
      <%= os %><br>
    <% end %>
  </div>
  <div>
    <p>Devices</p>
    <% @devices.each do |device, count| %>
      <%= count %> <>
      <%= device %><br>
    <% end %>
  </div>
</div>
最后将 analytics 的路径添加到 routes 文件里即可
get "/analytics" => "analytics#index"
效果如下,非常简朴,但个人使用,就不追求样式了